Introduction to UVM
Welcome to the world of Universal Verification Methodology (UVM), where efficient and effective verification processes come to life. If you’re venturing into UVM, you may have stumbled across terms like UVM_Top and UVM_Test_Top. These components are pivotal in structuring your verification environment.
But what exactly do they entail? Understanding these elements can significantly enhance your simulation experience. Whether you’re a novice or an experienced engineer, grasping the ins and outs of UVM_Top and UVM_Test_Top will empower you with better control over your testing scenarios.
Let’s dive deep into this essential topic, unravel their differences, explore their benefits, and arm yourself with practical insights for successful implementation. The journey through the intricate maze of UVM starts here!
Understanding UVM_Top and UVM_Test_Top
UVM_Top and UVM_Test_Top play pivotal roles in the Universal Verification Methodology. They are essential for structuring your testbench effectively.
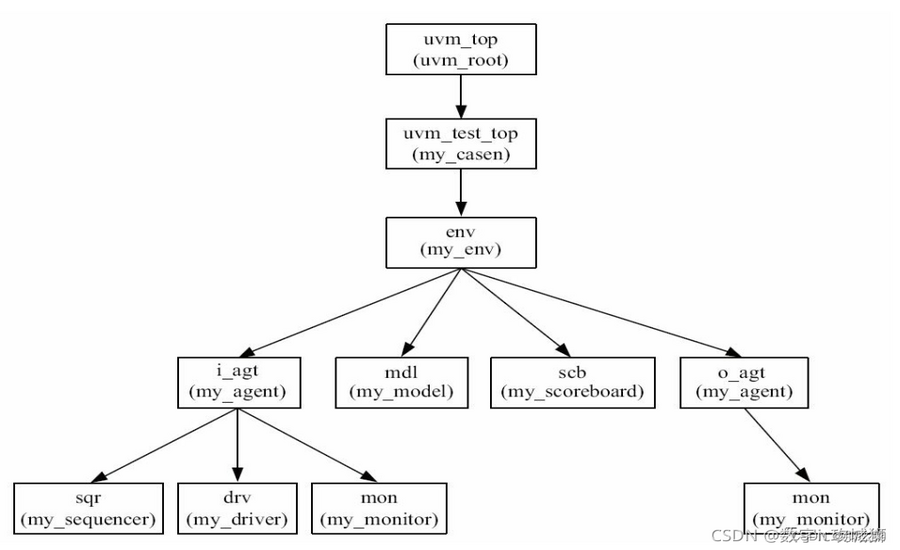
UVM_Top acts as the top-level module in a verification environment. It orchestrates various components like agents, monitors, and scoreboards. This makes it a crucial element for managing complex designs.
On the other hand, UVM_Test_Top is specifically designed to facilitate individual tests within that environment. It focuses on executing specific scenarios or test cases efficiently.
While both serve important purposes, their functionalities differ significantly. Understanding these distinctions helps streamline your verification process, making it more efficient and organized.
Using them correctly can enhance code readability and maintainability while reducing confusion during simulation runs. Grasping their unique roles empowers engineers to build robust verification environments tailored to their needs.
Key Differences between UVM_Top and UVM_Test_Top
UVM_Top serves as the primary container for your entire verification environment. It brings together all components and configurations required to execute a simulation.
On the other hand, UVM_Test_Top acts as a specialized layer within UVM_Top focused on executing specific test scenarios. This distinction allows you to run targeted tests without altering the overall structure of the verification environment.
While both serve critical roles, their purposes differ significantly. UVM_Top encompasses everything from agents to scoreboards, ensuring that they function cohesively.
Conversely, UVM_Test_Top zeroes in on particular methodologies or use cases during testing phases. This separation helps streamline your workflow and enhances modularity in design.
Understanding these differences can improve your approach to creating efficient testbenches and enable better resource management throughout various stages of development.
Benefits of Using UVM_Top and UVM_Test_Top
Utilizing UVM_Top and UVM_Test_Top brings several advantages to your verification process.
First, they enhance modularity. This allows for more maintainable test environments, as components can be easily swapped or upgraded without disrupting the entire structure.
Next, these constructs streamline the simulation process. By providing a clear hierarchy, they help organize tests effectively. This organization minimizes confusion when navigating complex systems.
Another significant benefit is improved reusability. Once you establish a robust framework with UVM_Top and UVM_Test_Top, you can leverage it across multiple projects.
These tools also promote better collaboration among team members. With defined roles and responsibilities in place, tasks become clearer, fostering an efficient working environment.
Using these top-level constructs facilitates easier debugging by isolating issues within specific layers of your architecture.
How to Implement UVM_Top and UVM_Test_Top in Your Verification Environment
Implementing UVM_Top and UVM_Test_Top in your verification environment is a structured process that can enhance your testbench architecture. Start by defining the UVM_Top, which serves as the top-level module for your entire verification environment. This component orchestrates all sub-modules like agents, monitors, and drivers.
Next, create the UVM_Test_Top that will manage individual tests within this framework. Each test should inherit from the base class provided by UVM to leverage its features effectively.
Connect these components carefully to ensure smooth communication between them. Use configuration objects to pass parameters easily across different layers of your hierarchy.
Don’t forget to instantiate necessary sequences and scoreboards inside the test top for validation purposes. Properly setting up these components will lay a solid foundation for robust verification processes in any project you undertake.
Troubleshooting Common Issues with UVM_Top and UVM_Test_Top
When working with UVM_Top and UVM_Test_Top, it’s common to encounter some hiccups. One frequent issue can be related to the configuration of your testbench. Ensure that all components are correctly initialized and connected.
Another problem might arise from signal mismatches between modules. Make sure that the bus interfaces align properly, as any discrepancies can lead to simulation failures or incorrect results.
Keep an eye on your environment’s memory consumption too. If you’re facing slow simulations, consider optimizing your code or breaking down large data sets into smaller chunks for easier management.
Logging is crucial in troubleshooting. Utilize built-in reporting tools within UVM to identify error sources quickly. A well-structured log will guide you to potential issues faster than manual searches through the codebase.
Don’t underestimate the power of community forums and resources. Engaging with fellow users often uncovers solutions for problems you’ve yet to discover on your own.
Best Practices for Using UVM_Top and UVM_Test_Top
When using UVM_Top and UVM_Test_Top, organization is key. Maintain a clear hierarchy in your testbench to avoid confusion during complex simulations. A well-structured layout enhances readability and simplifies debugging.
Utilize consistent naming conventions for your components. This practice helps team members quickly identify different parts of the verification environment, making collaboration more efficient.
Leverage reusable components whenever possible. By designing modular tests, you can save time and reduce redundancy across projects.
Integrate thorough documentation throughout your setup. Clear comments and guidelines will assist others in understanding your design choices while providing valuable insights for future enhancements.
Regularly run regression tests to catch potential issues early on. Continuous validation ensures that changes do not introduce new bugs or disrupt existing functionalities within your UVM framework.
Conclusion
When it comes to verification in the UVM environment, understanding UVM_Top and UVM_Test_Top is crucial for achieving efficient and effective results. By grasping their distinct roles within your testbench architecture, you can enhance both performance and reliability.
Utilizing these components properly allows for better organization of your testing framework while streamlining the development process. The benefits are clear: improved modularity, easier debugging, and a more structured approach to verification tasks.
Implementing best practices ensures that you’re not only using these elements effectively but also paving the way for future scalability in your projects. As challenges arise during implementation or execution, knowing how to troubleshoot common issues helps maintain productivity without unnecessary setbacks.
By keeping these insights in mind, you’ll be well-equipped to leverage UVM_Top and UVM_Test_Top successfully within your verification environments. Embracing these strategies will transform your workflow into one that’s both robust and adaptable as technology continues to evolve.